
A sewing pattern is essentially a template to cut fabric pieces. Later, the pieces are sewn together to create a garment or other sewn item.

But how to make sewing patterns? You need to gather necessary tools like paper, rulers, a tape measure, scissors, and more. Use the tools to measure, draw, and cut your design. You can turn your ideas into real clothes easily with the right steps.
Let’s walk through a step-by-step sewing pattern-making guide you need to get started!
Pattern Making Tools for Fashion Design
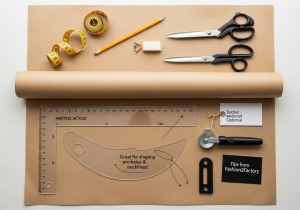
Gather these essential tools before drafting:
- Large paper (use pattern drafting paper or brown craft paper)
- Straight and curved rulers (a French curve is ideal)
- Measuring tape
- Pencil and Eraser
- Scissors (one for paper, one for fabric)
- Notcher and Tracing wheel (optional but helpful)
Tips from Fashion2Factory: Grab a French curve – it helps you shape armholes and necklines much more easily, especially if you’re starting.
Get sewing patterns from a professional pattern design company to save time and avoid technical errors.
Step-by-Step Sewing Pattern Guide
We have described a step-by-step guide for sewing pattern making. You can also visit our website to get your custom sewing pattern design.
Step 1: Take Measurements
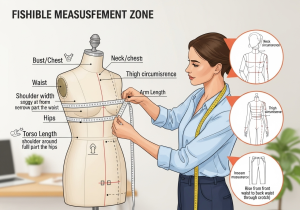
Measure the person or mannequin.
Focus on these key areas:
- Bust or chest
- Waist
- Hips
- Shoulder width
- Arm length
- Torso length
Use a soft, flexible tape measure and record each measurement right away.
Take additional detailed measurements as needed, neck circumference, rise, thigh, or inseam, and as necessary for more complex or fitted styles.
Step 2: Choose Your Garment Type
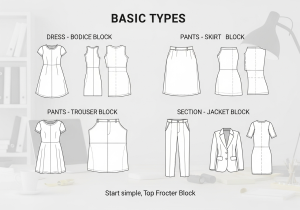
You may start with a dress, shirt, pants, jacket, etc. Your project will determine which base pattern—or “block”—you should start with. A block, a basic template, is the element you’ll customize to match your style.
Start with a bodice block for Tops and dresses.
You can use a trouser block or skirt block for Pants or skirts.
We recommend starting with a simple top or skirt to build your confidence at the beginning.
Step 3: Draft the Basic Block
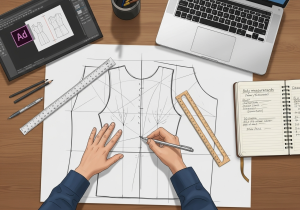
Use your measurements to draft the basic shape of your garment.
Mark key points like the shoulders, bust, and waist, then connect them with straight and curved lines.
Place your darts (those triangular folds that shape the fabric) correctly to get the right fit.
We create accurate blocks for our clients using digital tools like Adobe Illustrator and CLO 3D.
Step 4: Add Design Details
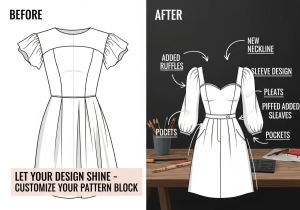
Let’s Get Creative!
You can now add the following details on your block:
- Darts
- Pleats
- Ruffles
- Different necklines
- Sleeves
- Pockets
You can turn your basic block into a one-of-a-kind garment design with these elements.
Step 5: Add Seam Allowances & Notches
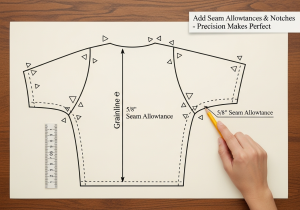
Add seam allowance (about ⅜” to ⅝”) so you easily get the fabric room to sew.
Mark small notches to line up your pattern pieces. Use them to match sleeve caps to armholes and darts to waistlines accurately.
We design all our professional patterns with clear notches and grainline markings for smooth and frustration-free construction.
Step 6: Label, Cut, and Test Your Pattern
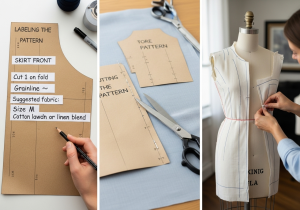
Label each pattern piece with these details:
- The garment name (for example, “Skirt Front”)
- How many pieces to cut (like “Cut 1 on fold”)
- The grainline (to show fabric direction)
- The size (such as “Size M”)
- Suggested fabrics (like “Lightweight cotton or linen”)
Example: On your “Skirt Front” piece, you might write:
Skirt Front – Cut 1 on fold – Grainline →
Size M – Suggested fabric: Cotton lawn, linen blend
Next, you can go ahead with the following steps:
- Cut your pieces using a low-cost, neutral fabric used for testing.
- Sew them together to create a toile meaning a test version of the garment.
This way you can check fit, proportions, and construction before using your final fabric.
We always recommend making a toile first—even professional designers do it!
Bonus Tips from a Pattern Design Expert
Here are 5 expert tips from our lead pattern designer straight from the studio floor:
- Always test your pattern with muslin (a low-cost fabric) first to check the fit before using your real fabric.
- Add notches and grainlines early.
- Keep a notebook to note your measurements and pattern blocks so you can find them easily.
- Use tracing paper for copying patterns and trying new ideas without ruining the original.
- Be patient. Your first patterns won’t be perfect — and that’s okay. You’ll get better with practice.
Follow these tips carefully and we’re here to support you at every step of your pattern-making journey.
Want to Skip the Drafting?
So, if pattern-making feels like too much, you’re not the only one. It takes skill, time, and practice to get it right — and that’s where we come in.
At Fashion2Factory, we offer:
- Custom sewing patterns from your sketch or sample
- Tech packs that manufacturers can use right away
- Easy-to-follow patterns for beginners
- Grading for all sizes
We’re here to make quick sewing patterns for you whether you’re starting a fashion brand or sewing your clothes.
Final Thoughts
Learn to make sewing patterns is an awesome skill. Start easy styles and don’t be afraid to ask questions.
You can also search for sewing patterns pdf free download for your desired sewing patterns.
When you’re looking for an expert sewing pattern designer to save time and cost, we are here for you!